Categories
GIS

Got a receiver inside my head – writing Spectrum Direct data as CSV

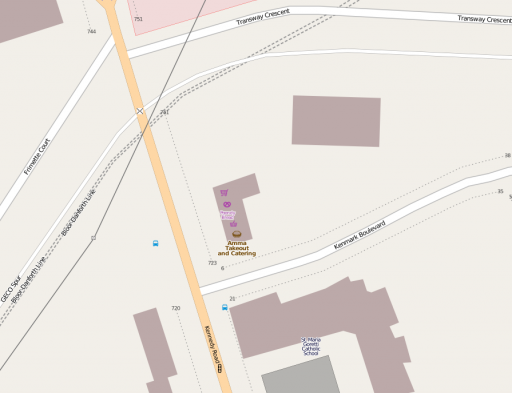
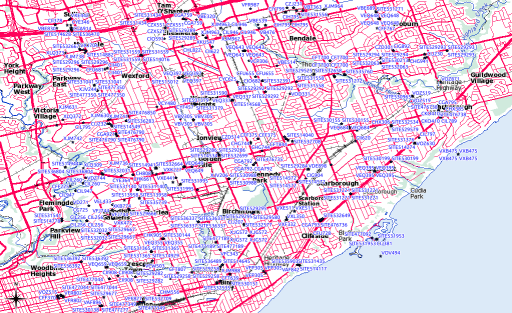
Industry Canada publishes the locations of all licensed radio spectrum users on Spectrum Direct. You can find all the transmitters/receivers near you by using its Geographical Area Search. And there are a lot near me:
While Spectrum Direct’s a great service, it has three major usability strikes against it:

  1. You can’t search by address or postal code; you need to know your latitude and longitude. Not just that, it expects your coordinates as a integer of the format DDMMSS.
  2. It’s very easy to overwhelm the system. Where I live, I can pretty much search for only 5km around me before the system times out.
  3. The output formats aren’t very useful. You can either get massively verbose XML, or very long line undelimited text, and neither of these are very easy to work with.

Never fear, Perl is here! I wrote a tiny script that glues together Dave O’Neill‘s Parse::SpectrumDirect::RadioFrequency module (which I wonder if you can guess what it does?) to Robbie Bow‘s  Text::CSV::Slurp module. The latter is used to blort out the former’s results to a CSV file that you can load into any GIS/mapping system.

Here’s the code:

#!/usr/bin/perl -w
# spectest.pl - generate CSV from Industry Canada Spectrum Direct data
# created by scruss on 02010/10/29 - for https://glaikit.org/

# usage: spectest.pl geographical_area.txt > outfile.csv

use strict;
use Parse::SpectrumDirect::RadioFrequency;
use Text::CSV::Slurp;
use constant MINLAT => 40.0;    # all of Canada is >40 deg N, for checking

my $prefetched_output = '';

# get the whole file as a string
while (<>) {
 $prefetched_output .= $_;
}

my $parser = Parse::SpectrumDirect::RadioFrequency->new();

# magically parse Spectrum Direct file
$parser->parse($prefetched_output) or die "$!\n";
my $legend_hash = $parser->get_legend();    # get column descriptions
my @keys        = ();
foreach (@$legend_hash) {

 # retrieve column keys in order so the output will resemble input
 push @keys, $_->{key};
}

# get the data in a ref to an array of hashes
my $stations = $parser->get_stations();

my @good_stations = ();

# clean out bad values
foreach (@$stations) {
 next if ( $_->{Latitude} < MINLAT );
 push @good_stations, $_;
}

# create csv file in memory then print it
my $csv = Text::CSV::Slurp->create(
 input       => \@good_stations,
 field_order => \@keys
);
print $csv;
exit;

The results aren’t perfect; QGis boaked on a file it made where one of the records appeared to have line breaks in it. It could filter out multiple pieces of equipment at the same call sign location. But it works, mostly, which is good enough for me.
Categories
GIS

making of the Canada Day post

Making the My Neighbourhood, Canada Day 2010 post took a bit of planning.

Hardware

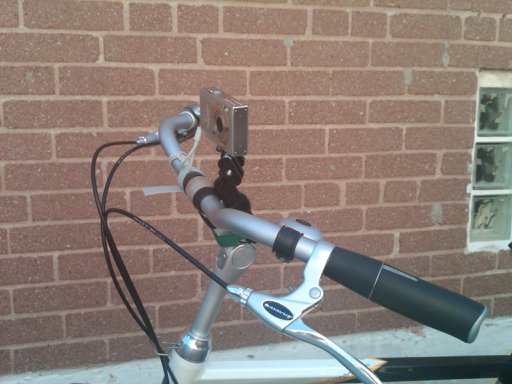
I attached an Ultrapod to the stem of my bike, and added another velcro wrap for security. The GPSMAP 60CSx fitted quite nicely under the bungees on the rear rack. The Ultrapod didn’t quite have enough stability to stay in place without drooping sometimes. I bought (but haven’t tried) the KODAK Adventure Mount, which might be more stable.

The Camera

… is a fairly basic Canon PowerShot SD790IS. What’s important is that it can run CHDK. I’d set it to take a 6MP picture approximately every 20s using the Ultra Intervalometer script.

Synching the camera to the GPS for geotagging

At the end of the trip, I took a picture of my GPS clock screen:


and then compared the time to the camera’s timestamp using jhead:

$ jhead IMG_0316.JPG
 ...
Date/Time    : 2010:07:01 16:59:50

So if the GPS time is 16:58:55, we need to subtract 55s from the camera time to make them match:

$ jhead -ta-0:00:55 IMG*JPG

And let’s check the result:

$ jhead IMG_0316.JPG
 ...
Date/Time    : 2010:07:01 16:58:55

Perfect.

Geotagging the pictures

I used ExifTool. You could also use Prune if you prefer something more graphical. Exiftool does this with minimal fuss:

$ exiftool -geotag canadaday2010-0.gpx IMG_0*JPG

(I realize I could have used exiftool instead of jhead for the timestamp check, but I’ve been using jhead for about a decade, so I know it well and like its compact output.)

You probably want to make use of a WordPress plugin like Add From Server to speed the upload process.

Adding the OpenStreetMap map

The www.Fotomobil.at » wordpress openstreetmap plugin is very flexible, but rather complex to work with. Here I’m calling the map with both markers (and lots of them) and a GPX trace:

[ osm_map lat="43.729" long="-79.275" zoom="14" width="640" height="480" marker_file="https://glaikit.org/wp-content/uploads/2010/07/canadaday2010marker.txt" gpx_file="https://glaikit.org/wp-content/uploads/2010/07/canadaday2010.gpx" ]

(Note that in the example, in order to stop WordPress from interpreting the shortcode, I’ve had to introduce a space after the [ and before the ]; in real life, they’re not there.)

The gpx file is just plain vanilla (canadaday2010.gpx) but the marker file (canadaday2010marker.txt) is a bit special. I must admit to have slightly misused the format, as I discovered that the fourth column, the description, is free-form HTML. As the default is to popup a small image thumbnail, I wedged in code to link to the full-sized image when the thumbnail was clicked. This required me to work out what attachment ID WordPress thought each picture would be. If you’re careful to upload sequentially to a single-user blog installation, you should be okay hitting the right links.

Each line of the marker file was made with a (loooong) shell one liner, an unholy mess of backticks and awk. I’m glad I can’t find it. It really wasn’t pretty at all.

Categories
GIS

proj.4 init annoyances: it’s all apple’s fault

I was going to write a rant about how Ubuntu sets up proj.4 init files incorrectly, then I found that the problem actually lies with OS X. OS X is unusual for a Unix variant, as it uses a case-insensitive file system; flarp.txt is the same as FLARP.TXT. Under more traditional Unices, they’d be different files.

Most of the examples on this blog were written under OS X, and I was concerned when they didn’t work under Ubuntu. It seems that proj.4 uses a very simple way of defining initialization files. If you specify, say, “+init=EPSG:2958”, proj digs around in its configuration files for a file called EPSG, then searches for an identifier in that file which matches the ID 2958. Under OS X, you can specify EPSG, epsg, or even EpSg – they all work. Under Ubuntu, using anything other that epsg fails with this message:

<proj>:
projection initialization failure
cause: no system list, errno: 2

In short, use lower case init specifications, and it’ll work everywhere.

It seems that there are some other applications (mapserver?) that have problems calling proj, so if you’re seeing this error and it’s not something you can correct from the command line:

  1. Find out where your installation keeps its initialization files. You can do this by setting PROJ_DEBUG=1:
    PROJ_DEBUG=1 proj +init=epsg:2958
    and you should get a message like:
    pj_open_lib(epsg): call fopen(/usr/share/proj/epsg) - succeeded
  2. cd /usr/share/proj (or wherever the last command said the epsg file was located)
  3. sudo ln -s epsg EPSG

Now your installation should work no matter which case you use. Camel case, unfortunately, excluded.

Categories
GIS

in which I discover OpenStreetMap editing

While I’ve used OpenStreetMap data before, I’ve never added anything to it. That changed after going to Mappy Hour last night, and meeting Richard Weait. He has a bunch of useful tutorials on his website.

Categories
GIS

toronto data updated

Hey, they’ve updated most of the data sets on toronto.ca | Open!

Categories
GIS

More on iPhoto GPS weirdness

Okay, following on from my last post I geek out a lot here, so here’s a summary: In a test of 1600 images, iPhoto moved the recorded GPS location of a picture an average of 6.17m, and in one case moved the image 11.25m from its correct position.

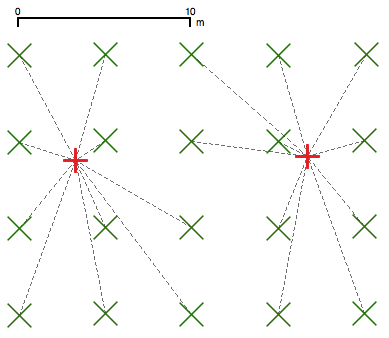
I created a 40×40 array of points approximately 5m (okay, 5 UTM units apart, precisely) and assigned the locations to JPEG files using ExifTool. These files were imported into iPhoto, then exported. The before and after coordinates were plotted and compared:

  • The green crosses are the original coordinates
  • The red crosses are the coordinates assigned by iPhoto
  • The dashed lines map the before coordinates to the after.

In real life, I realise it’s difficult with most consumer GPS units to resolve points 5m apart. It’s pretty egregious of Apple, however, who appear to take great pains to retain all the camera’s metadata, to mash the stored coordinates so badly.

Categories
GIS

Don’t trust iPhoto’s exported GPS coordinates

John the new jersey geographer put this better than me, but it appears that iPhoto rounds exported GPS coordinates to the nearest integer second of arc. There’s really no reason for them to do this, and it’s caused me to waste several hours tracking down why my tagged and exported photos didn’t match up.

Looking at the output data, I’m not sure if it’s to a second of arc – it appears to be rounding to the nearest hundredth minute, or approximately 0.000167°. Since GPS location uncertainty is in the fifth decimal place, this aliasing of the data is annoying.

Categories
GIS

The highest point in Toronto

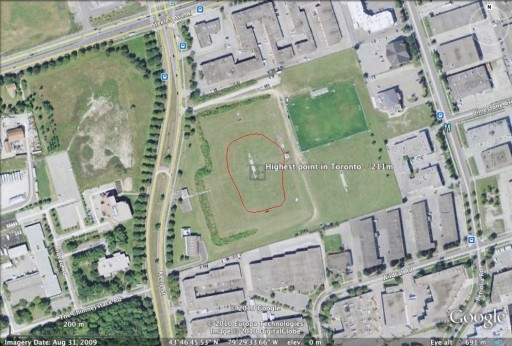
The highest point in Toronto has an elevation of 211m, and appears to be in the middle of one of York University‘s playing fields, just southwest of Keele & Steeles W:

The red blob is the 211m contour, and the centre point is at 43.779325°N, 79.492655°W. The contour was derived from the MNR DEM data for the province.

The city says the highest point is 209 m (at intersection of Steeles Ave West and Keele St), which is pretty close in all three axes.

Categories
GIS

MNR DEM tiles

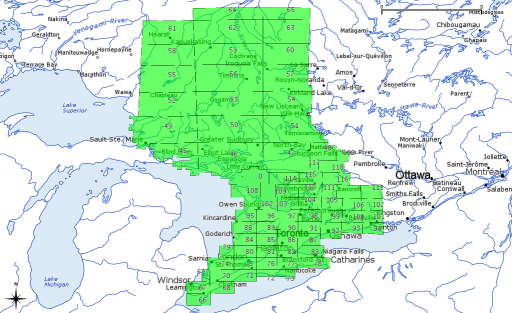
So I got the DEM tiles for my zone, couriered from Peterborough. Even zipped, they are several gigabytes. Here’s a visual guide to the tiles I got:

It seems that every project I work on is split across several tiles. My fair city is no exception:

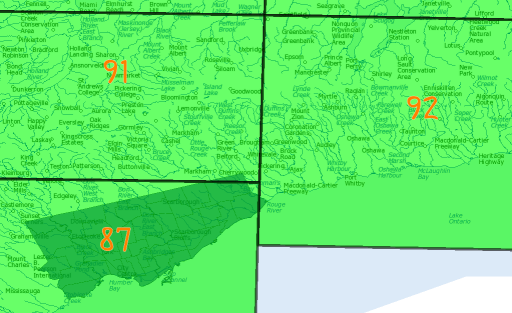
Most of the city is in tile 87, but the northern and eastern corners poke into tiles 91 & 92. Merging the files and pulling out the area isn’t that hard.

First off, we need to know the extents we want. Conveniently, I’d already transformed the Open Toronto data to the same CRS, so I could just go from the extents of one of the city shape files:

$ ogrinfo -al ../open-toronto-shp/dest/2958/city-wards/TCL3_ICITW.shp | grep '^Extent'
Extent: (609538.195527, 4826360.800158) - (651613.577420, 4857439.389359)

You can then use gdal_merge.py to merge the tiles. Annoyingly, rather than using the familiar ‘lower left – upper right’ coordinate convention for bounding box, it uses ‘upper left – lower right’, so working out a buffered bounding box is a bit of a pain:

gdal_merge.py -v -of EHdr -o Toronto.flt -n -9999 -ul_lr 609000 4858000 652000 4826000 `find . -iname 'd*.flt'`

The MNR DEMs are shipped as ESRI .hdr Labelled files, 32-bit floating point. The CRS used is NAD83 Zone 17N. For all that they’re large, they’re quite quick to load and move around.

Categories
GIS

Land Information Ontario – or, how I semi-accidentally ordered 3.5GB of terrain data

The Ontario Ministry of Natural Resources has a fairly well-hidden service that provides free geodata to the general public. One has to register with a sign and e-mail form, but there’s a large number of useful data sets available. The only disadvantage is that you can’t tell if your order will be delivered by download, or physically burnt to DVD and mailed from the MNR in Peterborough. The municipalities shown above were a download; the DEMs of my entire UTM zone? They’re in the mail …